Thursday, August 04, 2011

Halibut with braised lentils, asparagus and soy ginger sauce

I recently volunteered at the 3rd annual Taste: Victoria's Festival of Food and Wine and if you haven't been to this festival yet, make a mental note, because you'll want to go next year. Taste is a fabulously indulgent and classy food event that focuses on local chefs, restaurants and wineries. I had a great time managing the social media during the Main Event - tweeting, retweeting, replying and checking out pictures people captured on their phones. I had a blast and will definitely be there again next summer.

As a thank you, the organizers Kathy and Ladawne gave me a generous gift including the cookbook, Hastings House Country Estate. From the country house hotel it's named after, this delightful book from Salt Spring Island features some of their best recipes for brunch, dinner and dessert. The recipe for sablefish, braised du puy lentils, green asparagus and soy ginger emulsion caught my eye and inspired me to leave the lawn chair long enough to give this a try.

Pleased with my results, this is an elegant main course that makes you feel like you're dining out - but in the comfort of your own home. Keep your eyes on the lentils, the liquid and baking time may need adjusting. But isn't that part of the fun?


Halibut with braised lentils, asparagus and soy ginger sauce (serves 2)


Braised Lentils
2 shallots, diced
2 cups green or brown lentils, rinsed
1 carrot, diced
2 sticks of celery, diced
3 tablespoons butter
1/4 - 1/2 cup red wine
2 cups vegetable stock

Preheat oven to 350. In a medium saucepan, melt butter and saute shallots, carrot and celery until soft. Stir in rinsed lentils then add wine and vegetable stock. Place the pan, with a lid on it, in the oven for about 50 minutes. Check and stir along the way, sampling to see if more wine or stock is needed.

Soy Ginger Sauce
1 tablespoon fresh ginger, grated and juiced
1/3 cup soy sauce
2 tablespoons olive oil
juice from 1/2 lemon
1 tablespoon + a pinch more of brown sugar
salt and pepper to taste

Grate the ginger and squeeze juice into a small bowl. Mix remaining ingredients together with a whisk and set aside.

Asparagus
1 bunch of green asparagus, trimmed and peeled
dap of butter and a splash of olive oil
salt and pepper to season

Snap off the stocky part of each asparagus stem and then peel using a vegetable peeler. In a medium fry pan, melt butter and olive oil together. Once hot, add asparagus, salt and pepper and quickly sear until tender and slightly charred.

Halibut
2 portions of halibut
salt and pepper
olive oil

Season each piece of halibut with salt and pepper, both sides. Heat a large fry pan with olive oil. Once hot, sear both sides of the halibut until just cooked all the way through.

To serve, plan a large spoonful of lentils in the middle of your plate. Top with halibut, grilled asparagus and drizzle the soy ginger sauce on top and around the plate. Pour a glass of wine, light some candles and enjoy!

Sunday, July 17, 2011

Ginger Coconut Dahl Made Easy

I'm not going to pretend I've been making a lot of incredible dinners lately because I haven't. I mean I've been busy doing things, clearly, but I've been very, very lazy in the kitchen. One reason why I have been able to essentially make nothing for dinner for two weeks and still eat well is because of this company from the Cowichan Valley: Mitchell's Soup Co.


They're a family-run food company that make gorgeous mixes of soups, stews, chilies, a rice pilaf and even a chai spice pudding. A few years ago, co-workers at my previous job gave me a beautiful food basket as a parting gift - and in this basket was Mitchell's Louisiana Texan Chili Mix. It's truly embarrassing how long it took me to make it (three years!) but this past spring during my great pantry purge, I finally did. And wow, was it ever mind-blowingly good. I'm not even tempted to try to replicate the combination herbs and spices, because it was so well done. Of course that may actually be a good reason why I should try to recreate the flavours for myself... but certainly not in my current lazy condition. Instead, I found out where I could buy more and bought as many as I could carry. The good news for those of you in the Victoria area, you can find them at the Sidney summer market every Thursday evening, 5:30 - 8:30 p.m.

Driving out to Sidney, I headed straight for their stand and stocked up on soups, chilies and this amazing package of ginger coconut dahl. It's one of their best-selling products and it's easy to see why. Red lentils, yellow split peas, shredded coconut, candied ginger simmered together with veggie flakes, tomatoes, herbs and spices. Serve over rice and you have yourself a meal. You could add chicken or prawns and top with fresh mango and have an even better meal. Go out, track this product down and buy an armful, I can't recommend it enough!

Sunday, July 03, 2011

Healthy Raw Kale Salad

I've been doing this thing lately where I make a big batch of this healthy kale salad and keep it in the fridge for lunches and to have on hand as a quick side to weekday dinners. And it turns out my boyfriend really likes it. So, it's a win-win in our house.


It's a healthy combination of raw kale, carrots and red cabbage and keeps well in the fridge for 2-3 days. The salad tastes great with grilled salmon or tuna and corn on the cob. It's one of those salads that makes you feel good about yourself after just a few mouthfuls because it's so good and healthy - and makes you want to congratulate yourself for making such a healthy choice. And you should.

I've also been going to the gym a little more regularly and trying to get in some kind of exercise on days that I don't. Like walking or cycling somewhere I might otherwise drive to. What this all adds up to is a slightly healthier lifestyle that I feel good about. One of things I've been thinking about but haven't done yet is buying a pedometer to see how much I walk on an average day. I think it would be a good exercise to do a check in with myself. Should I be walking more?


In the meantime, here's the recipe.


Healthy Raw Kale Salad
Adapted from Planet Organic's Hail-to-the-Kale recipe

Ingredients
1 bunch kale, chopped somewhat finely
2 carrots, grated
1/4 of a red cabbage, thinly sliced with a mandolin if you have one
1/4 cup pumpkin seeds
1/4 cup sunflower seeds
3 tablespoons Bragg Liquid Aminos or natural soy sauce (found in health food stores)
1 tablespoon of toasted sesame oil
1 tablespoon olive oil
1 tablespoons balsamic vinegar
dash oregano

Directions
Wash kale and chop finely.

In a cast iron skillet over medium to high heat, stir sunflower and pumpkin seeds. Remove from heat when they’re toasted golden brown. While the skillet is hot, add in a few drops of soy sauce, which will sear onto the seeds. Remove and let cool.

In a large bowl combine chopped kale, carrots, cabbage and seeds. Set aside.

In a small bowl whisk together oil, Bragg Liquid Aminos, balsamic vinegar and oregano and pour over kale mixture. Toss until evenly coated and chill 2 hours before serving.

You might also like:

Sesame Kale Salad
Steamed kale with lots of toasted sesame seed flavour. So good, you'll eat a whole bunch (of kale).

Kale Chips
Thin bites of crispy baked kale.

Bulgar Salad with Kale, Salami and Olives
A great side dish to make for dinner or enjoy it on its own for lunch. Tastes good served warm or cold.

Friday, June 24, 2011

Who Doesn't Love Marinated Roasted Red Peppers

My evening began with what has become a nearly daily visit to Fairfield Market, the new local grocery shop around the corner recently opened by the owners of Niagara Grocery. The shop has lots of organic and local produce and has quickly become my week day hot spot for last minute dinner needs and salad fixings. For three dollars, I picked up three soft red peppers to roast and marinate. They are tasty and convenient to have on hand for salads, sandwiches, pasta sauces or to snack on straight out of the jar.


You can buy jars of roasted red peppers but there's really no need because they are so easy to make. Slice the peppers in half, remove the seeds and char under broiler in the oven for 15 minutes or so. Toss them in a paper bag or pot with a lid and let them sweat and the blackened skins loosen. Then remove the skin and bottle with olive oil, balsamic vinegar, oregano, garlic, salt and pepper. They will last a couple of weeks in the refrigerator in a sterilized jar in their marinade, only getting tastier and tastier.

Later this evening I'm going over to a friend's house to kick the weekend off with a glass of wine or two and paired with some cheeses, salami and red wine, these peppers are going to hit the spot. It's a classic Italian antipasto that always goes fast because, well, who doesn't love roasted red peppers...


Marinated Roasted Red Peppers (serves 2-4)

Ingredients
3 large red bell peppers
3 tablespoons extra-virgin olive oil
1 tablespoon balsamic vinegar
2 garlic cloves, halved
1/2 teaspoon ground oregano
pinch of red chili flakes
salt and pepper to taste

Directions
Slice each pepper in half and clean out the insides. Place onto a baking tray cut side down and roast them in a hot oven under the broiler for about 15 to 20 minutes, until the skins are charred and blackened.

Once they have reached this point, take them out of the oven and place each half into a brown paper bag or something (pot, bowl) that you can place a lid on. Once the peppers have cooled and the skins have loosen, peel away the charred peel and slice into thin strips. Place them in a flat bowl, such as a pasta bowl, so the marinade will completely cover them.

While the peppers are roasting, combine the extra-virgin olive oil, balsamic vinegar, ground oregano, garlic, chili flakes, salt and pepper in a small bowl.

Pour the dressing over the roasted peppers. Let them marinate in the refrigerator for 30 minutes or longer before serving. When ready to serve, remove the peppers from the marinade and enjoy!

Saturday, June 18, 2011

A mouthful of sunshine: avocado cocktail

If you're looking for a dish that will make the sun shine (if only for a while) than you need to try this recipe because it's bursting with all the best summer flavours: tomatoes, jalapenos, cilantro and fresh lime juice. I can't remember the first time I made this avocado appetizer; it would have been many years ago. But it's been a summer favorite for a long time now because it's light, fresh and you feel like your laying under the warm desert sun of Mexico when eating it.


There's many different ways to put the cocktail together. You could have it as a light lunch served with salad greens. Or make as an appetizer to a Mexican dinner fiesta by cutting the avocado into quarters and serving on a plate, in a bowl or even in a margarita or martini glass. You can't go wrong however you serve it because the combination of flavours and that lingering taste in your mouth is the most impressive thing.

 You could serve this with homemade sangria and black bean tacos with feta and cabbage slaw.

When it comes to buying avocados, like any produce, I find it always pays off to take a little extra time and care in picking the fruit. If you have foresight, it's a good idea to ripen avocados at home. If not, pick one that is slightly soft to the touch and has a darker shell. The brown stem should still be intact at one end. The best test for finding out if the avocado is good is by removing the stem to see if the flesh is green or has started turning brown. The one thing you don't want is one someone else has removed the stem on and decided to leave behind.

Needing a little pick-me-up after a somewhat uninspired week brought me to making this for lunch today. And now with a cup of coffee in hand, I'm starting to feel better. I can't wait for those really warm (and lazy) summer days: for that first trip to the lake or spending the whole day laying out in the backyard reading. But until than, I'll be content with an avocado cocktail.


Avocado Cocktail (serves 4)

Ingredients
2 ripe avocados
1 ripe tomato, diced
1 jalapeno, stemmed, seeded and diced
1/2 small red onion, diced
1-2 tablespoons cilantro, chopped
juice of 1 lime
olive oil to drizzle
sea salt

Directions
Mix together the diced tomato, jalapeno, onion and chopped cilantro. Add the lime juice just before serving.

Cut the avocado in half, and then peel and pit. Place avocado halves (or quarters) on a small plate or bowl, and fill the centers with the tomato mixture, allowing the mixture to spill over. Drizzle with olive oil and top with a pinch of good quality sea salt.

Tuesday, June 14, 2011

Roasted Eggplant and Chickpea Salad

Chickpeas, roasted eggplant, red onion and fresh cilantro tossed in lemon vinaigrette are the fixings for a fantastic light lunch or a side dish for dinner. I made this for lunch yesterday from a BBC recipe I came across and it's one more recipe that continues my love affair with chickpeas. They're easy and cheap and even cheaper if you buy dried chickpeas in bulk. I like to buy canned chickpeas by the armful when they go on sale - so I always have plenty on hand and only a can opener away.


I particularly like the Moroccan flavours in this dish. Of course the roasted eggplant gives it a real Morocaan flair but also the paprika, cumin and cilantro. This is an interesting salad with lots of subtle flavours and ranks up there with some of my other favorites such as this recipe for chickpea goji berry salad and warm butternut and chickpea salad with tahini. The beans add protein, which makes this a complete, light meal. Perfect for the spring or summer.


Roasted Eggplant and Chickpea Salad (serves 4)

Ingredients

Salad
3 eggplants
1 can (540 ml/19 oz) of chickpeas
1/2 red onion, diced
2 garlic cloves, minced
1/2 bunch cilantro, chopped

Dressing
1 teaspoon cumin
1 teaspoon and a pinch of paprika (smoked or Hungarian)
1 teaspoon honey
juice of 1 lemon
4 tablespoons olive oil

Directions
Cube the eggplant in about one half inch cubes, toss in a little olive oil, salt and pepper and roast in the oven at 350 for about 20 minutes or until soft.

Meanwhile,
drain and rinse the chickpeas, then tip into a bowl with the roasted eggplant, garlic, red onion and cilantro. Mix the dressing ingredients together in a small bowl and drizzle over the chickpeas and eggplant. Enjoy!

Friday, June 03, 2011

Coconut Date Balls

Let's talk about dates, and you know what kind I'm talking about. The sweet digestive kind that you don't need to look good for. I've been eating a lot of dates lately because they're a great snack when you need a little energy or are looking for something sweet (but not processed sugar sweet) to eat.


I often have two bowls on the coffee table - one with dates and the other with almonds - to munch on while watching a movie or when we're spending the evening watching some good television. Dates and almonds are the perfect pair because the nutty flavour and crunch of the almond nicely offsets the sweet soft bite of the date.

This recipe for coconut date balls came to me accidentally. I was thumbing through an old family cookbook, The American Vegetarian Cookbook: from the fit for life kitchen, looking for a classic vegetarian dish to make for dinner. Instead what I found was this confection: usually found in December because of its resemblance to snowballs. Colliding perfectly with my recent craze for dates, I decided to give it a try, adding almonds and vanilla extract to the mix. The result? A great snack to have on hand any time of the year. Keep them frozen or refrigerated in an airtight container.

Another one of my favorite energy boosting snacks that I like to make and have on hands are these homemade power spheres with dried apricots, apples, sunflower seeds and pumpkin seeds.


Coconut Date Balls (makes 20)

Ingredients
1 cup dates, seed removed
1 cup roasted almonds
1/4 cup shredded, unsweetened coconut + additional 1/4 cup for rolling
1 teaspoon vanilla extract

Directions
Place almonds in a food processor and proceed until fine. Slowly a dates, one at a time until it forms a paste. Add coconut and vanilla and pulse a few more times until blended.

Using your hands, roll dough into inch inch balls. Place in a bowl with the remainder shredded coconut and roll the balls around until covered in coconut.

Refrigerate or freeze.

Tuesday, May 17, 2011

A picnic favorite: salmon with cucumbers

One of my favorite things to do once the weather is warm is packing a picnic dinner to take down to the beach. I wrap the plates in tea towels, pack food in containers, add cutlery and a few cold beers and I'm all set for a lovely beach side dinner. The only thing left to do is find a sheltered spot with soft sand, a slight breeze and a glorious view.


Coming up with food ideas for a picnic does requires a little thought and planning. The meal has to be portable and relatively easy to eat with minimal mess or dripping juices. What you choose should taste good even if it's not as hot as it should be. Cold or deli style salads are always popular but I like this favorite: grilled salmon with pickled cucumbers and radishes.

One of the reasons this dish is so picnic friendly is because salmon tastes good hot, warm or cold. It doesn't matter. The cucumbers and radishes are pickled in dill and vinegar and are full of fresh flavours that all go well with salmon. Add a classic potato salad or green bean salad, corn on the cob and perhaps a baguette and you have everything you need for a romantic and relaxing evening.


Grilled Salmon with Pickled Cucumbers & Radishes
(serves 2)

Based on Martha Stewart's recipe

Ingredients
salmon (2 fillets)
1/4 of a cucumber, thinly sliced (use a mandolin if you have one)
4-5 radishes, thinly sliced (same as above)
3 tablespoons dill, minced
2 tablespoons rice wine vinegar
1 teaspoon sugar
salt and pepper to taste

Directions
Peel cucumbers in lengthwise strips, leaving thin strips of skin between peelings. Either by hand or with a mandolin, slice cucumbers and radishes into very thin rounds. Place both in a bowl with rice wine vinegar, dill, sugar, and pinch of salt to season. Toss to combine, and set aside.


Season both sides of the salmon with salt and pepper. In a hot fry pan or on a hot grill, cook the salmon for several minutes, until nicely browned. Turn over, and continue grilling until just cooked through. Salmon will look flaky when done. Place pickled cucumbers on a serving platter, top with salmon fillets, and serve.


Monday, May 16, 2011

A cool spring day fix: carrot and cilantro soup

I've never been a fan of carrots. They seem simple, abundant and humdrum. Raw carrots have too much crunch, detracting from any flavor I might enjoy and cooked carrots never really appeal. But this soup is an exception, reminding me of some of carrot's redeeming qualities. They're an aromatic vegetable used to give flavor to stocks, soups and stews. They're good for your health, they're good for scooping up hummus and they're delicious in this soup.


One of the reasons why this soup in particular changed my mind is because it's pureed. The extra step of pureeing and straining the soup adds sophistication with a smooth, silky texture. The act of straining the soup removes ingredients added to impart flavors and never intended to be on the table, ie the carrots. This is a great cooking technique that people often don't take the time to do but that makes a difference and will take your soups to the next level.

The other reason this soup is so good is because it's based on Alice Waters' carrot and cilantro soup from her cookbook Chez Panisse Vegetables. Alice is a pioneer in using organically and locally grown foods. Her recipes are simple, yet perfect with complex flavors arising from just a few ingredients.


Roasted Carrot and Cilantro Soup
adapted from Alice Waters' recipe

Ingredients
2 tablespoons olive oil
1 yellow onion, diced
1 pound of carrots, chopped
3 potatoes, cubed
1.5 litres (6 cups) vegetable stock
1 bay leaf
1/2 bunch cilantro (leaves only)
1/2 teaspoon turmeric
salt and pepper to taste

Directions
Heat olive oil in a soup pot and add diced onion. Saute and stir occasional until soft and golden.

Peel potatoes and cut into cubes, peel the carrots and cut cross ways a half inch thick . Once the onions are soft, add potatoes and carrots and continue to stew for about 10 minutes.

Next add turmeric, bay leaf and vegetable stock. Bring to a boil, then lower to a simmer and let it bubble away until the vegetables are cooked and soft. Take the pot off heat and add in the cilantro leaves.

Puree the soup in a food processor in multiple batches until smooth. Strain through a medium sized sieve.

Monday, May 09, 2011

My top five favorite kitchen gadgets

I'm not big into kitchen gadgets, but I have a kitchen and there's more than a few tools I've come to love over the years. I've slowly built up a kitchen with all the things I need and like... such as my matching Sophie Conran dishes and my collection of enamel bowls. But even more than these, I simply couldn't cook happily without these five gadgets. They make me a better cook and life in the kitchen easier.

I've defined "gadget" as something with a little more design to it than a basic kitchen tool. So this list doesn't include wooden spoons, chef's knives, cast iron pans, spatulas, cutting boards or other basic kitchen tools. It also doesn't include small electrics like food processors, which is another thing I couldn't do without. Leave a comment if you have any favorite gadgets you'd like to share!


Kuhn Rikon Epicurean Garlic Press
I only recently bought a garlic press after going my whole cooking life without one. I thought it was just as easy to flatten and chop a garlic clove as it would be to use a garlic press, and I would be improving my knife skills and saving myself from the awful chore of washing and cleaning a press. And perhaps I'm still in the honeymoon phase but my new garlic press is the best.

I did buy the best so maybe that's why I feel this why. Kuhn Rikon is highly recommended because it minces with less effort than other garlic presses (thanks to its curved handle). The large sieve hinges out to easily clean under running water. I bought mine at Plenty but it's also sold at Muffet & Louisa and online. It's expensive but worth it, so very worth it.


Vintage aluminum juicer
This is a vintage Wear-Ever aluminum juicer for lemons, limes and oranges, made in Canada in the 1930's. I was first tipped off to this gadget by chef extraordinaire Heidi Fink at one of her cooking classes. The fact that it was vintage and hard to find made me want it all the more. But I've come to love it for a few reasons: a few easy presses and you have fresh citrus juice, it has a removable strainer that catches the seeds, and it has a spout which makes it easy to pour the juice and measure out what you need. It washes up easily and is clearly designed to last.


Ceramic ginger grater
A beauty, this gadget is a minimalists dream: simple, white and with nice edges. I can't remember what I did before having this handy grater, but likely choking on chunks of ginger. With rows of sharp teeth, this grater easily grates and juices fresh ginger root and it's easy to wash. I bought mine at Ming Wo Cookware in Vancouver but I've seen them around at various kitchen shops.


Kitchen scale
A good electronic scale is crucial for baking. I don't do a lot of baking but I still find my kitchen scale essential when it comes to cooking soups, stews or anything that I need to weigh vegetables in half, one or two pound quantities. I have two vintage EVA Gepo wall scales from Denmark, one in red and the other in yellow. I love both of them- not because they're Danish (I do love Danish design!) but because they hang from the wall, take up no counter space and are always ready to use.


Pepper and Salt mills
Another kitchen essential that I've had so long I don't know what I'd do without are my salt and pepper grinders. Good salt and pepper mills are great for grinding fresh salt and pepper to season you cooking with. Peugeot is considered the best for quality, durability and classic good looks. I especially like the pepper mill because you can adjust the size of grind- a larger grind for salad dressings or pasta sauces and a fine grind when you want a more subtle seasoning.

Wednesday, May 04, 2011

Cinco de Mayo: why Mexicans don't celebrate May 5th

Now live online at EAT Magazine, you can click over and check out my guest blog on why Mexicans don't celebrate Cinco de Mayo.

While in Puerto Vallarta, my family and I bacame a local fellow who told us - to my surprise - that Cinco de Mayo is not a public holiday in Mexico and is not as enthusiastically celebrated as it is around the world.


In the United States and here in Canada, we welcome the day as an occasion to celebrate and enjoy Mexican food and culture. But in Mexico, the day commemorates a battle that took place in Peubla in 1862, where troops triumphed over the French army who out numbered them two to one. It’s a dark part of their history, full of oppression, and one that a local friend told me they would rather let pass.

Nonetheless, celebrations continue around the globe. It’s thought of as a reason to gather friends or family together to share some great Mexican food, cold cervezas and just maybe a shot of tequila.

Because this just may help bring some sun and warmer weather our way, here's a recipe for sangria. It can be put together simply and cheaply using red wine, lime juice, simple syrup and diced apple. The lime juice and syrup adds a refreshing flavour and zing.


Sangria (recipe is per glass)


Ingredients
1/2 cup simple syrup
1/2 cup red wine
1 shot of lime juice
1/4 of an apple, diced ice

Directions
Make the simple syrup first. In a medium saucepan, combine one cup sugar and one cup water. Bring to a boil and stir until the sugar has dissolved. Cool.

In a wine glass, and a handful of ice cubes and add syrup, red wine, lime juice and diced apple. Sit back, relax and enjoy.

Thursday, April 28, 2011

Paella, Mexican Style

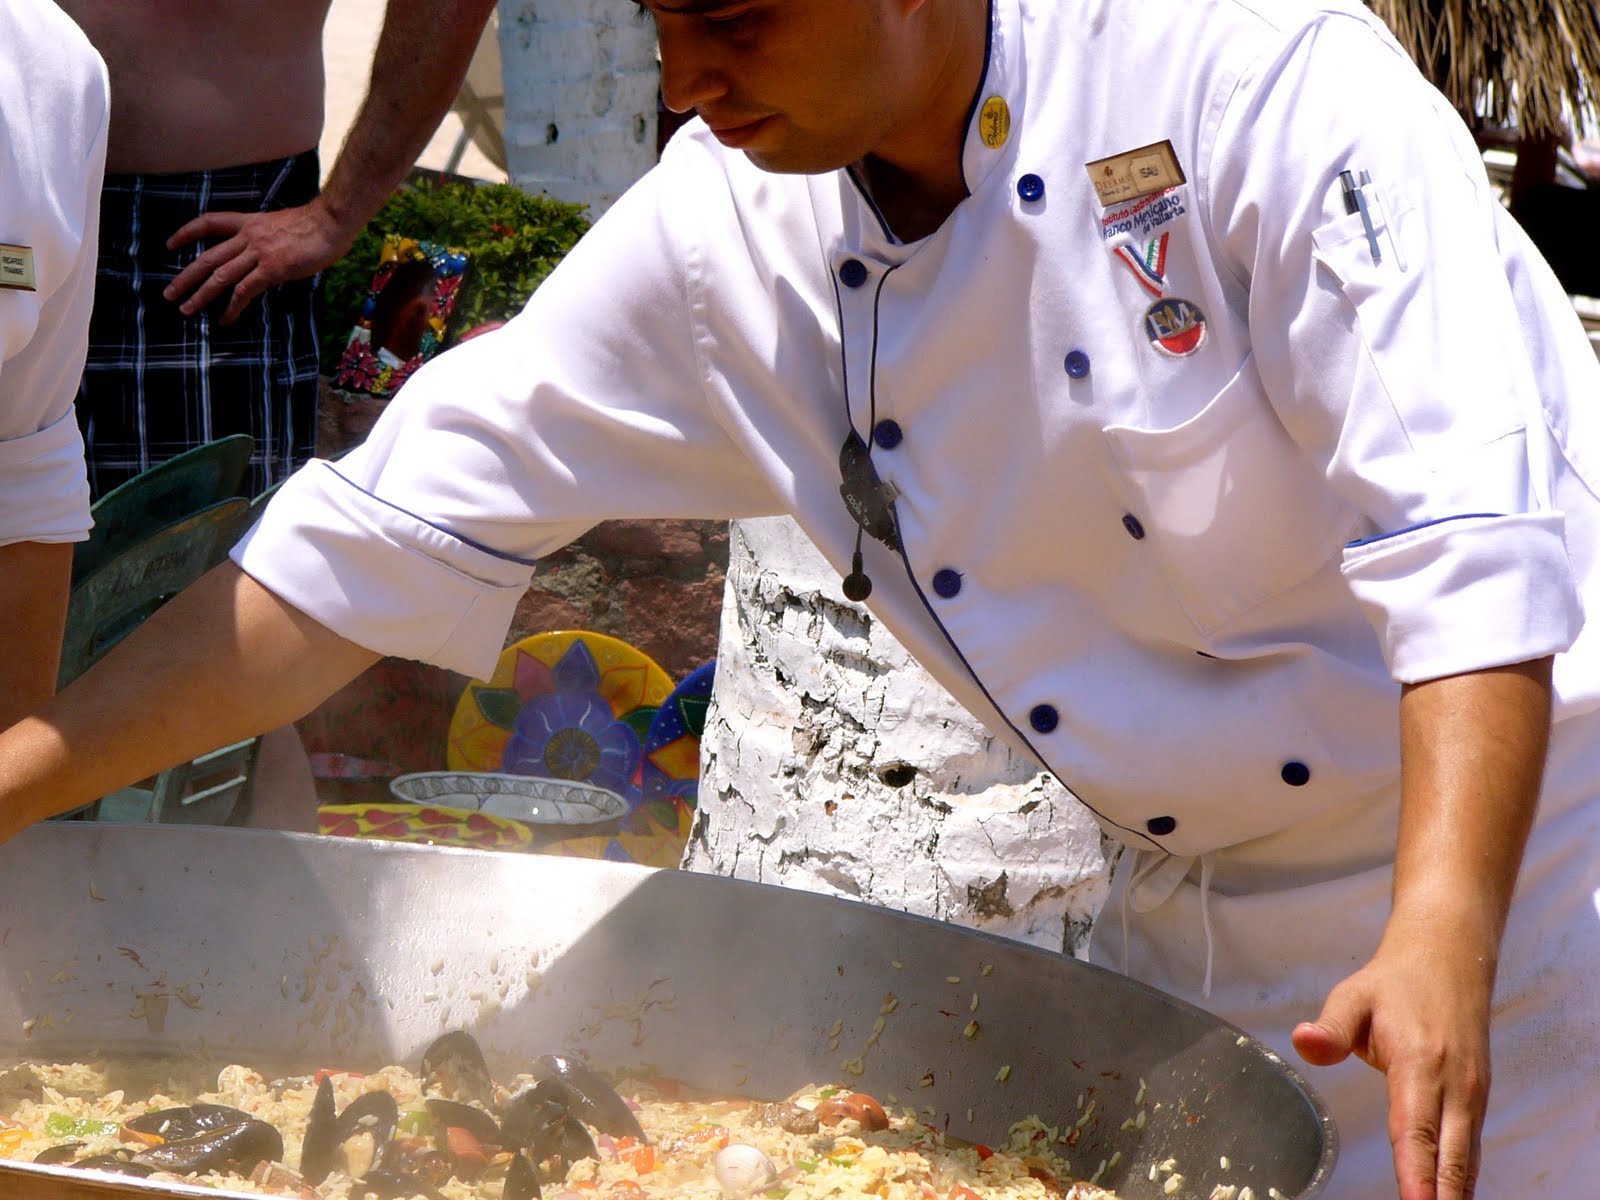
It's been less than a week since I've been back from my relaxing vacation in Mexico and as the tan fades a little each day, my fond memories remain strong and clear. During the vacation, I had the chance to take an outdoor cooking class with my two sisters - under the sun and just off the beach in Puerto Vallarta. We learned how to make paella and sangria.


If you're raising your eye brow at the instructor's choices, you're not alone. While Spain comes to my mind for both dishes, Mexico does have their own versions by the flavours and ingredients they use. Mexican paella recipes are traditionally cooked outdoors or in the garage in huge iron or stainless steel paella pans, and different flavors are used. Spanish paella doesn't generally include chili. Saffron is popular in both Mexican paella and Spanish style paella recipes.

We made what's called a 'mixed paella' because it has seafood such as clams, prawns, scallops and white fish (we used mahi mahi), chicken, beef and chorizo sausage. When I make again I'll omit the beef, but what and how much you use is up to you. The results will still turn out incredibly delicious and heartwarming.


Simmer and cook the rice right in the pan so the rice can soak up all the amazing flavours. In the class, fish stock, white wine and an alarming amount of saffron were added to the pan (I think the instructors were really trying to impress us!). All of which add up to the ultimate dream for an uncooked grain of rice.

I don't have any quantities for the ingredients, but hey you don't need those. Use what feels right, add more of what you like and omit what you don't. You'll be fine so long as you use one cup of rice for every two cups liquid (stock and wine). So make a glass of sangria, take a deep breath and jump in. Being creative and improving is what cooking is all amount.

And if you still feel like you need quantities, check out an earlier recipe of mine for paella.


Paella (feeds a crowd)

Ingredients
clams
mussels
prawns
white fish (such as halibut, mahi mahi, monkfish other other firm white fish), cubed
chicken
chorizo sausage, half-inch slices
olive oil
garlic
red, yellow and green peppers, cubed
onions- red and white onion, chopped
oregano
saffron, a generous amount
chili powder
chicken or fish stock
white wine
arborio rice
salt and pepper to season

Directions

Heat olive oil in a large paella pan (wok or fry pan) and add garlic.

Add chicken and saute for about five or so minutes. Than add chorizo sausage, clams and mussels. Continue to cook for a few more minutes, than add prawns and after a few more minutes, then white fish. You want to allow lots of time for each of these ingredients to cook.

Next add the chopped onions, red, yellow and green peppers and continue to saute until soft.

Add the white wine, taking care to pour into the pan around the edges. Than add stock, chili powder, saffron and rice. Simmer until the rice is cooked and tender. Your final step is to add the oregano, salt and pepper. Taste and adjust seasonings to your preference, and enjoy!

Sunday, April 24, 2011

Puerto Vallarta: relaxing, warm and great food

Sitting in front of me on the flight to Mexico was my sister, her husband and my darling nephew Charlie. Only six months old, I was expecting little Charlie to cry and scream his way down the Pacific coast but this wasn't how it was at all. He was happy and quiet, bouncing around and excited for what turned out to be a fabulous, sun-filled vacation.

Puerto Vallarta has fabulous beaches, a spectacular Malecon (or boardwalk) and lots of great Mexican food and seafood. The sandy beaches of Puerto Vallarta curve along the coastline and act as the meeting place between the postcard-perfect blue ocean and rocky cliffs where luxury homes and hotels are built into.


To celebrated my Dad's 60th birthday, the family all went down to Puerto Vallarta to spend a week at one of these luxury hotels - complete with our own private beach and all the food we could eat. Happily, I spent every day on the beach laying in the sun or under an umbrella, swimming or reading, eating and drinking. One of my favorite things to do each day was enjoying a plate full of chips, salsa and fresh guacamole in the afternoon. And drinking a Margarita.

While the guacamole was a little different each day, it was always fresh and delicious. On some days, it was simple and chunky flavored only with lime, garlic and the perfect amount of salt. On other days, the avocado was more blended and tomatoes, jalapenos, white onions and cilantro were added.

Here's my recipe for guacamole, one that closely resembles the dish I so much enjoyed each day. You could also add minced tomato, chilies or lemon juice instead of lime.


Guacamole

Ingredients
1-2 medium avocados, ripe
1-2 teaspoons fresh lime juice
1/8- 1/4 teaspoons sea salt
1-2 cloves of garlic, minced

Directions
Cut the avocado(s) in half and remove the skins and pit, place in a bowl. Add lime juice, salt and garlic and mash together with a fork. Leave a few small chunks of avocado. Taste and adjust salt and lime juice to your liking.

Serve with tortilla chips and enjoy!

Monday, March 28, 2011

Sweet sweet peppermint patties

There's nothing quite like making homemade chocolates. The gratification that comes from making a delicate little sweet with your own hands and have it taste better than what you could buy. It's rewarding and feels good. I don't make a lot of sweets or desserts because, well, than I'd I'd have to eat it. But it's nice to have a few back pocket recipes, to pull out and make for special occasions, dinner parties or when your day needs a little sweetening.


The moment I saw Cascadia Kitchen's recipe for peppermint patties I knew I'd have to make these for myself. As a kid when I was old enough to pick out my favorite ice cream, I often went for mint chocolate chip. As I got older it was Junior Mints, than Ritter Sport's peppermint chocolate bar. Yes, it's been one long continuum of love for peppermint and chocolate.

These peppermint patties turned out just as well as I imagined they would... with a wonderfully smooth and creamy filling that you'll never find in a Junior Mint. Because coconut oil turns from solid to liquid when its warm, they really do melt in your mouth. To dress these up, you can sprinkle a little coconut on the top of each patty. If you're feeling comfortable and like to improvise, try different kinds of toppings like dried cranberries, candied ginger or citrus zest.


Homemade Peppermint Patties (makes 24 patties, 1 1/2 inches in diameter)
From Cascadia Kitchen

Ingredients
1 cup of organic coconut oil
1/2 cup of honey
1/4 cup of organic unsweetened shredded coconut
2 teaspoons peppermint oil
1/2 bag of dark chocolate chips (I used Ghirardelli chocolate chips, 60% cacao)

Directions
In a medium sized bowl, beat together the coconut oil, honey and peppermint oil until well blended and smooth. Stir in the coconut.Refrigerate until fairly firm (30 minutes or so) or set in the freezer for a short period.

Using a small scoop or 2 small spoons, scoop the mixture onto a parchment lined baking sheet and flatten them a bit to make a patty shape.

To make a nice smooth shaped patty, I take a flat bottomed glass, filled with a little warm water, and use it to flatten the mixture into little disks. The warmth in the glass is enough to melt the mixture just enough to allow the glass to lift off cleanly.

Place the baking sheet with the patties into the fridge or freezer while you melt the chocolate.

Melt the chocolate in a double boiler and then allow to cool slightly.

Remove the patties from the fridge or freezer. Dip them into the melted chocolate and then return them to the parchment lined baking sheet.

If you'd like you can sprinkle a little coconut on the top of each patty. Store in an airtight container in the fridge and enjoy!

Friday, March 25, 2011

Hooked from the first bite: Organic Fair Chocolate

Foodies are a special breed. They're passion people who have an endless enthusiasm for all things food. Here on Vancouver Island, we have a wonderful community of people who are friendly, welcoming and knowledgeable and have boundless energy for what interests them. And whether you grow it, make it or just plain appreciate it, there's room for everyone.

This week, I met the loveliest woman while attending film screening hosted by Slow Food Vancouver Island at the Canoe Club. Marisa Goodwin lives on an organic farm in Cobble Hill and makes, among many things, Organic Fair chocolate. She also makes ice cream with organic waffle cones, sodas with birch sap and various spices and sells them directly from the farm store.


Listening to Maria talk so passionately about her farm and the things she makes was inspiring. And, made me slightly ashamed that I hadn't yet tried her Organic Fair chocolate bars (which I quickly went out and did). I love sweets and have always preferred chocolate to chips. So, why hadn't I tried these dark chocolates until now?

Marisa makes 15 different kinds of dark chocolate bars. They are all a minimum of 70% cacao and are certified organic and fair trade. The two kinds that caught my eye and made my heart beat a little faster were the Canadiana with dark chocolate with maple syrup, sun dried apples and alder smoked salt, and Sakura with sun dried cherries and candied ginger. Both have a wonderful texture with a combination of soft bites with a slight crunch. Soft apples with salt, chewy cherries with candied ginger.
So to help spread a little inspiration this weekend, I encourage you to check out Slow Food and find a convivium nearest you, or, check out Organic Fair Chocolates on Facebook or online.

Have a wonderful weekend,
Melody

Sunday, March 20, 2011

Tortilla chips & white bean dip

As part of my New Year's resolution, and what has now turned into a three month quest, I've been cooking with a lot more dried beans and grains. It's an attempt to to clean out the pantry and rotate all of beans and grains with new ones. It's been a healthy exercise that has inspired me to try out new recipes like this one for white bean dip. It's tasty and nutritious and a nice switch up from some of my other favorites like caramelized onion dip, baba ghanoush and warm artichoke and olive dip.

When I made the resolution back in January, I had no idea it would take so many months. I thought maybe one month, two tops. It's been reassuring to know how long I could last, if I needed to, on all the dried and canned goods in the cupboard.


This recipe caught my eye because it's a healthy dip with white beans, lime, cilantro, tomatoes and green onions. No cheese in sight. The combination of lime and cilantro adds a nice Mexican flavour and distracts from the fact that you're eating a whole lotta beans. And because of the two cups of beans that this recipe calls for, I've now happily used up all the dried white beans in the pantry. Only barley, black-eyes peas, macaroni, orzo and quinoa remain. Getting closer to seeing the light or the back of the cupboard.

In another month or so, I'll be ready to turn my thoughts to re-stocking the pantry. Bill Jones recently wrote this article for stocking an awesome kitchen pantry and I can't wait to start turning my thoughts to restocking. I'd love to hear what dried beans or grains you keep on hand. What's your favorite thing to have in the pantry?


White Bean Dip
From Cooking Light

Ingredients
2 cups (16 ounces) white beans, cannellini or other white beans, rinsed
1/2 cup cilantro
2 tablespoons lime juice
2 cloves garlic, minced
1 tablespoon diced jalapeno pepper
1 1/2 teaspoon soy sauce (sounds strange but it's a flavour enhancer, like salt)
3 tablespoons olive oil (add more to get the consistency you like)
1/4 teaspoon chili powder

1/4 cup chopped plum tomatoes
1/4 cup diced green onions

Directions
Place the first eight ingredients in a food processor and pulse until smooth. May need to add more olive oil to get the consistency you prefer.

Top with chopped tomatoes and green onions. Serve with tortilla chips and enjoy!

Wednesday, March 16, 2011

A wee bit of ye o' Irish

Since any foodie worth their salt will be celebrating Saint Patrick's Day with food and drinks on March 17th, I'd like to join the jig by wishing you a happy St. Paddy's Day and giving some recipe ideas. I've always felt a distant connection to Ireland, and with a middle name like Siobhan it's no wonder.

Growing up in Powell River, my mom use to babysit a lovely little girl named Siobhan McCormick and always liked the name. Thinking that I'd have a lifetime of repeating and correcting the name, she had the foresight to make it a middle name. I have no ancestral connection to Ireland, just a name that I love... and a fondness for Guinness!

Saint Patrick's Day is celebrated internationally and seems to be growing in popularity. Kids wear green and pinch those who don't and adults sip on Jameson Irish Whiskey. If you're like me and are looking to have a little Irish fun this year, here's some recipe ideas to get you started:

Put some greens in your bowl with a simple cream of broccoli soup or Simply Recipe's parsnip soup with leeks and parsley.

Or, try this pub classic crispy beer battered fish sandwich from Closet Cooking.

Some of my favorites that are big on greens are Simply Recipes' asparagus pesto with pasta or these ones for green bean salad with almonds or green bean and fennel salad with basil pesto.

Island Vittles' Irish Guinness and soda bread would make for a great afternoon treat.

And for dessert, the ultimate treat this St. Patrick's Day has to be Chocolate Guinness Cake. Oh my goodness!

Tuesday, March 08, 2011

Vegetarian Yemista: Greek Stuffed Peppers

I was destined, I think, to have a soft spot for Greek food. The wheels were set in motion during my formative years, ages 16 to 24, when I worked in a Greek restaurant busing tables and later waitressing. It was the 90's and despite it all, it was a pretty good job. Paid for my first car, my first trip to Europe and my way through university. But more than anything, it left me with an everlasting love for feta cheese and olive oil, spanakopita and lemon potatoes, and olives.


So when my friend Amy invited some friends over for a Mediterranean dinner, I jumped to the invitation. She put together a full spread including hummus, butter fried pita, dolmades, olives (from Stage), and stuffed red peppers. For dessert we had Turkish delight and halva (from Blair Mart on Pandora Street). And for wine, well I insisted on Italian. No ouzo, no Retsina.

The whole dinner was amazing, but the shining culinary star by far, were the vegetarian stuffed peppers. Red peppers filled with kefalograviera cheese, dried figs, pistachios, onions and rice and baked in the oven for nearly two tantalizing hours. Most of these ingredients can be found at a Mediterranean deli, like Blair Mart or Seven Valley Deli (2506 Douglas Street) in Victoria. This is a showcase meal perfect for dinner parties or weekends. Thank you Amy, take a bow.


Vegetarian Yemista: Greek Stuffed Peppers
This recipe is unabashedly re-posted from Authorized Amy

Recommendation: Prepare the stuffing the day before and leave it in the fridge over night. This step really lets the flavors mingle.

Ingredients
4 medium red peppers
1/4 cup olive oil
5 tablespoons rice
1/2 large onion, chopped fine
2 medium tomatoes, chopped and including the liquid
4 garlic cloves, minced
1 tablespoon spearmint, dried and crumbled
1/4 cup parsley, fresh and minced
1/4 cup pistachios
1/4 cup dried figs, chopped
1/4 cup kefalograviera cheese, cut into tiny cubes (can be found at a Mediterranean deli)
1/2 tsp salt
1/2 tsp pepper
3/4 cup water
1/4 cup olive oil
1 tablespoon tomato paste
8 bamboo skewers, pre-soaked in water

Directions
Combine all ingredients except the water, tomato paste, and second 1/4 cup of olive oil.

Cut off tops of peppers (move tops to the side - they will be used as lids); remove seeds and membrane.

Spoon stuffing into peppers, packing tight after every spoonful.

Place the peppers in a pan or casserole dish (the tighter the fit, the better the peppers will hold their shape); cover with matching tops and secure with skewers, piercing only the top of the pepper and the stuffing. (I placed the casserole dish on a pan in the over to avoid messy spill overs.)

Combine the water, olive oil, tomato paste, and a pinch of salt and pepper. Pour this mixture around the peppers.

Bake in a preheated 375°F oven for 1 3/4 hours; the peppers may be slightly blackened. Remove from oven and let sit for 1/2 hour before serving.

Sunday, March 06, 2011

Perfect weekday lunch: Chickpea Goji Berry Salad

It's Alive magazine's suggestion to make this salad on a lazy Sunday afternoon and bring to work for weekday lunches. A hearty salad of chickpeas, mandarin oranges, almonds, goji berries and feta cheese. I like practical tips like this - easy to follow and makes perfect sense. With the advice appealing to my sensibilities and the recipe appealing to my tastes, I fell for this salad hook, line and sinker.


It wasn't immediate though. I thought about this salad for a good two months before making it. I was 90 per cent sure it would be good, but still something held me back. The goji berries.

As healthy as this superfood is, adding them to a salad made me pause. You can buy them at any well stocked grocery store, in the bulk section. Tasty, but they're a little tough or dense to chew and could catch a person off guard, biting down on one when you're not expecting it. But, the beauty of this salad is that by letting the salad chill for an hour - or overnight - the goji berries and almonds soften slightly. Perfectly.

After making this salad three times now I'm confidently coming out to say it's a keeper. It's fresh and interesting tasting, and good. But you don't need to wait for a lazy Sunday to make it. It's a fast, easy salad to toss together which makes it perfect for weekdays when your time is tight and energy low.


Chickpea Goji Berry Salad (serves 4)

Adapted slightly from Alive Magazine

Ingredients
2/3 cup almonds, roasted and unsalted, chopped

1 - 19 oz (532 g) can chickpeas, drained and rinsed

1 - 10 oz (280 g) can mandarin orange segments, drained

1/2 cup dried goji berries

1/2 red onion, diced 

1 clove garlic, minced

1 tablespoon fresh ginger, minced

1 small jalapeno pepper, seeded and minced
 (optional)
handful of chopped cilantro or parsley
1/2 cup feta cheese, crumbled
2 tablespoons apple cider vinegar

2 tablespoons extra-virgin olive oil

Fresh ground black pepper to taste

Directions
Combine all ingredients in large bowl. Store in refrigerator for several hours before serving.